Blog
Irresistible Super Sweet Week Recipes
It’s a super sweet week! Get ready to indulge as we celebrate a trio of delicious days:
- Jan 23: International Sticky Toffee Pudding Day 🍮
- Jan 24: Peanut Butter Day 🥜
- Jan 27: Chocolate Cake Day 🎂
To mark this week of all things sweet and decadent, we’ve created three new delicious recipes:
Peanut Butter Brownies

What’s not to love – rich, dark chocolate brownies, packed full of chunky peanut butter, served with vanilla ice cream (hmmmm!)
I always use our base brownie recipe, which is one I’ve found to be a firm family favourite, and now a popular one in the café – dairy-free, although you can swap the Stork for butter if you prefer, and also without gluten, this is the star of the show.
Ingredients
- 185g Stork Margarine
- 185g Classic dark chocolate buttons
- 85g Doves Farm Plain flour
- 40g cocoa powder
- 100g Classic Dark chocolate buttons
- 3 medium eggs
- 275g caster sugar
- Jar of crunchy peanut butter
Method
- Preheat the oven to 180C/160C fan/gas 4.
- Add the Stork margarine and the 185g of chocolate buttons unsalted butter into a microwave-proof bowl, and melt in short bursts, taking care not to burn the chocolate.
- Leave the melted mixture to cool slightly.
- Line a 20cm square tin with baking parchment, making sure you push the paper into the corners properly.
- Sift the GF plain flour and cocoa powder into a medium bowl, and then resift again.
- Break the eggs into a large mixing bowl add the caster sugar and using a hand held or worktop mixer, whisk the eggs and sugar for 5 minutes or so, until they look thick and creamy. You’ll know it’s ready when the mixture becomes really pale and about double its original volume.
- Pour the cooled chocolate mixture over the whisked mixture, and gently fold in. Do the same with the sieved flour and cocoa powder mix before finally mixing in the chocolate buttons.
- Pour the mixture into the prepared tin, then add 8-10 large teaspoons of the crunchy peanut butter to the chocolate mix, evenly spaced out (I work on one dollop per slice) and then lightly drag through with a fork, so the peanut butter is slightly mixed into the chocolate.
- Bake in the oven, for 25 minutes. Check at the 25-minute point by gently shaking the tin, and if the brownies wobble a tiny bit, and there’s a shiny papery-like crust on top, that’s great, your brownie is ready to take out of the oven. I do like a fairly gooey brownie, so if you prefer a firmer one, do cook it a little longer until it no longer wobbles. This will give you a more solid, slightly dryer brownie though.
- Leave to cool, and completely cold before lifting out of the tin on the parchment paper, then cut as desired. I generally get 10 slices which are the perfect size portion of this decadent, rich brownie.
- Serve with ice cream and a chocolate caramel sauce, or simply on its own.
Sticky Toffee Cake

I love a good sticky toffee pudding, and so was looking for a similar idea which could be made for the café to sit as a piece of cake rather than a pudding. Well, I found just the thing, by simply slightly changing an old sticky toffee pudding recipe a friend had given me years before, and one which never failed to impress, hitting all those buttons a toffee pudd should.
Ingredients
- 125 g Stork Margarine
- 250 g self-raising flour
- 200 g dates, finely chopped
- 250 ml hot instant coffee, or 250ml of freshly brewed tea if you prefer
- 200 g light brown or muscovado sugar
- 2 tbsp golden syrup
- 3 medium eggs
- 1 tsp. bicarbonate of soda
- Caramel toffee sauce
- 200 g unsalted butter
- 3 tbsp caster sugar
- 4 tbsp golden syrup
- 397 g condensed milk (one tin)
Method
- Preheat oven to 180°C (160°C fan) mark 4
- Line a 20cm square tin with baking parchment, making sure you push the paper into the corners properly.
- Put the chopped dates into a bowl, pour over the hot coffee/tea, add the bicarb and soak for 10 minutes.
- Put Stork margarine and sugar into a large bowl and beat together using a handheld electric whisk until light and fluffy. Whisk in the golden syrup, eggs, flour and date mixture and pour the mixture into the lined tin and bake for 55min or until a skewer inserted into the centre of the cake comes out clean. Leave to cool completely in the tin.
- Put the butter, sugar, syrup, and condensed milk into a pan, and heat gently until the butter is melted. Increase the heat, stirring all the time, to prevent the sugars burning, until the mixture becomes thick and fudgy. Do keep an eye on this and don’t think you can leave it without stirring, I’ve burnt my caramel several times when I’ve not stood over the pan, stirring, so constantly does mean constantly in this case! Remove from the heat and cool.
- Using a skewer, poke some holes in the top of the cake, before coating the top with the caramel toffee sauce. Decorate with fudge pieces to finish, slice and enjoy.
- This can be eaten cold or warmed up and served with custard or ice cream.
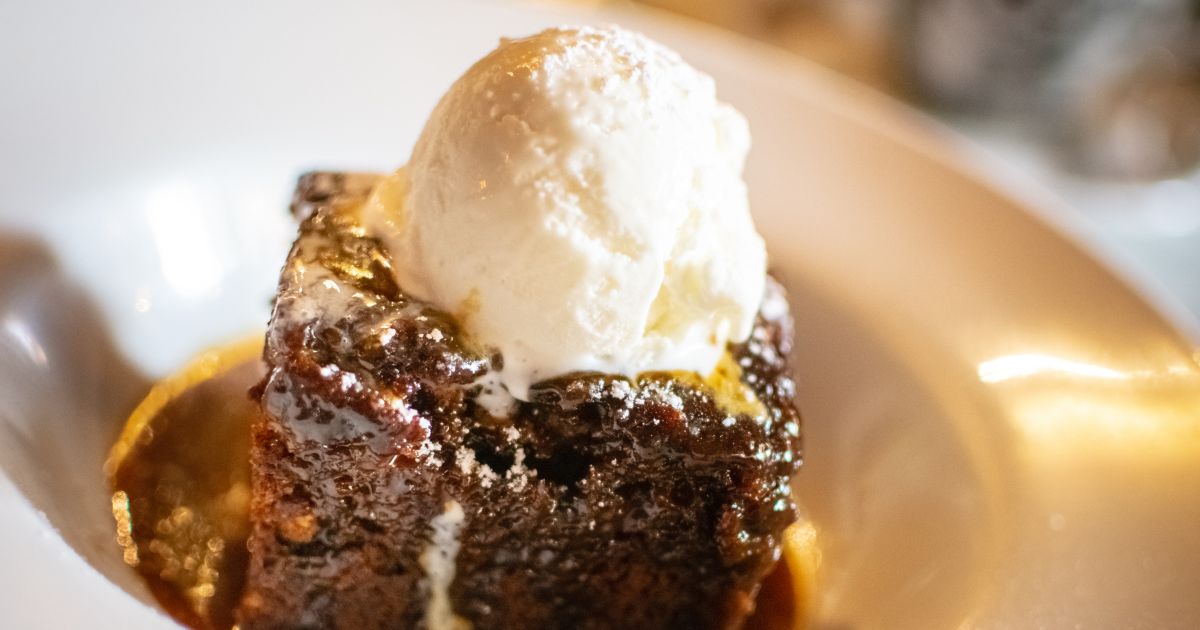
Sticky toffee caramel Brownies

Who said a sticky toffee pudding needs to be just toffee? I had a go at a caramel brownie, and used my favourite brownie recipe, adding dollops of sticky caramel sauce to the mixture in the tin – the result, a deliciously moist, sticky toffee brownie.
Ingredients
- 185g Stork Margarine
- 185g Classic dark chocolate buttons
- 85g Doves Farm Plain flour
- 40g cocoa powder
- 100g Classic Dark chocolate buttons
- 3 medium eggs
- 275g caster sugar
Sticky Toffee Caramel Sauce
- 200 g unsalted butter
- 3 tbsp caster sugar
- 4 tbsp golden syrup
- 397 g condensed milk (one tin)
Method
- Add the Stork margarine and the 185g of chocolate buttons unsalted butter into a microwave-proof bowl, and melt in short bursts, taking care not to burn the chocolate.
- Leave the melted mixture to cool slightly.
- Line a 20cm square tin with baking parchment, making sure you push the paper into the corners properly.
- Sift the GF plain flour and cocoa powder into a medium bowl, and then resift again.
- Break the eggs into a large mixing bowl add the caster sugar and using a handheld or worktop mixer, whisk the eggs and sugar for 5 minutes or so, until they look thick and creamy. You’ll know it’s ready when the mixture becomes really pale and about double its original volume.
- Pour the cooled chocolate mixture over the whisked mixture, and gently fold in. Do the same with the flour and cocoa powder mix before finally mixing in the chocolate buttons.
- To make the caramel toffee sauce, put the butter, sugar, syrup, and condensed milk into a pan, and heat gently until the butter is melted. Increase the heat, stirring all the time, to prevent the sugars burning, until the mixture becomes thick and fudgy. Do keep an eye on this and don’t think you can leave it without stirring, I’ve burnt my caramel several times when I’ve not stood over the pan, stirring, so constantly does mean constantly in this case! Remove from the heat and leave to cool slightly.
- Pour the mixture into the prepared tin, then add 8-10 large teaspoons of the caramel toffee sauce to the chocolate mix, evenly spaced out (I work on one dollop per slice) and then lightly drag through with a fork, so the sauce is slightly mixed into the chocolate.
- Bake in the oven, for 25 minutes. Check at the 25-minute point by gently shaking the tin, and if the brownies wobble a tiny bit, and there’s a shiny papery crust on top, that’s great, your brownie is ready to take out of the oven. I do like a fairly gooey brownie, so if you prefer a firmer one, do cook it a little longer until it no longer wobbles. This will give you a more solid, slightly dryer brownie though.
- Leave to cool, and completely cold before lifting out of the tin on the parchment paper, then cut as desired. I generally get 10 slices which are the perfect size portion of this decadent, rich brownie. Save any remaining sticky toffee caramel sauce in an airtight container in the fridge and use on ice cream when the mood takes you.